
Last update of 2023
Experimenting with new sensors, upgrading AKROS2 and plans for 2024

In my last post of 2023, I'll try to summarize what I've been up to these last few months. Firstly, I've been playing around with some more sensors - a VL53L7CX ToF Imager and a Raspberry Pi Sense HAT, and a new controller - an 8BitDo SN30 Pro gamepad. Besides this, I also spent some time upgrading my AKROS2 robots - both the mecanum and omni-wheeled variants. I've covered a lot of different things in this post, so I've ordered this post in the same order as I did these different things. However, feel free to use the table of contents and read it in any order you want. Let's start with the sensors and the controller first...
Sensors
VL53L7CX ToF Imager
The VL53L7CX is an upgraded variant of the VL53L5CX Time-of-Flight (ToF) Imager from ST Microelectronics. The new version has the same capabilities, providing 4x4 or 8x8 range values as output, but with a 90-degree FOV compared to the VL53L5CX which has a FOV of 65 degrees. I used this breakout board from Pololu:

The best part is that both sensors are compatible with the same driver software, so implementing it was easy. I simply renamed my ROS 2 and micro-ROS driver software to tof_imager_ros and tof_imager_micro_ros, so there is no confusion with the naming.
I forgot to capture a video of this new sensor at work, so here's an old video using the VL53L5CX breakout board from Sparkfun with micro-ROS. In terms of performance, both sensors behave identically, both with ROS 2 (directly connected to the RPi GPIO pins) and with micro-ROS (connected to the Teensy Micromod, which is connected to the RPi via USB):
Raspberry Pi Sense HAT
Next up, I needed an IMU for a prototype, and the only one I had was already wired to my AKROS2 mecanum robot. So, I picked up the Raspberry Pi Sense HAT v1 that I had purchased a while ago. The Sense HAT is a Raspberry Pi HAT, and a part of the Astro Pi project. It provides several sensors, a joystick, and an LED matrix, handy for displaying the sensor measurements. The v1 variant has a 9-axis IMU, Magnetometer, Pressure Sensor, Humidity Sensor, and a 5-button Joystick. These days, there's a newer v2 variant, with the addition of a color sensor (everything else remains the same). The Sense HAT v1 is not sold anymore (at least I couldn't find any online).

I started with the python-sense-hat library by Astro Pi, which provides access to all the different elements of the board. Using this library, I first created the sensehat_publisher node, which publishes the following:
/imu: IMU (accelerometer + gyroscope + magnetometer) readings, converted from NED to ENU if needed - sensor_msgs/msg/Imu message type/mag: Magnetometer readings in Teslas, converted from NED to ENU if needed - sensor_msgs/msg/MagneticField message type/pressure: Pressure sensor readings converted to Pascals - sensor_msgs/msg/FluidPressure message type/humidity: Humidity sensor readings converted from percentage to the range [0.0, 1.0] - sensor_msgs/msg/RelativeHumidity message type/temp_p: Temperature readings from the pressure sensor in degrees Celcius - sensor_msgs/msg/Temperature message type/temp_h: Temperature readings from the humidity sensor in degrees Celcius - sensor_msgs/msg/Temperature message type/joy: 5-button joystick readings as an array of buttons - sensor_msgs/msg/Joy message type/color: Color sensor readings in the form of RGBA, each in the range [0, 256] - std_msgs/msg/ColorRGBA message type
This node is implemented as a lifecycle node, and its states are displayed on the LED display. Other than this, the LED display is not used for anything else. Eventually, I plan on implementing a sensehat_display_handler node, which can visualize sensor and joystick measurements on the LED display.
I also created sensehat_node that launches sensehat_publisher in a single-threaded executor. Once the sensehat_display_handler is complete, I will also update the executor to launch both sensehat_publisher and sensehat_display_handler nodes. All of these nodes, config files, a launch file, and additional details about the implementation can be found within the sensehat_ros package on GitHub.
8BitDo SN30 Pro
Next, I got an 8BitDo SN30 Pro controller. It is a compact little Bluetooth (or wired using USB-C) controller that is comfortable to use and can fit into my pocket. It can connect to a Nintendo Switch, which I was considering buying a few months ago. Now, I'm going for a Steam Deck, more details later.
It has the same number of inputs as the Stadia controller (standard layout with 4 special buttons) (see more info in my earlier post about controllers). However, there are a few differences:
The L2/R2 buttons are digital, even though they show up as axes in some of the modes.
The A/B and X/Y buttons are flipped.
One of the special buttons (bottom left corner) is considered a turbo enable/disable button in some of the modes. This allows some buttons to be set as turbo buttons.
Just like the Stadia controller, there are a few mystery buttons that appear in some modes
The controller can connect to the RPi using three of the four available modes, each with different features and mappings. More details can be found in the mapping document in akros2_teleop, where the mapping during each mode is shown.
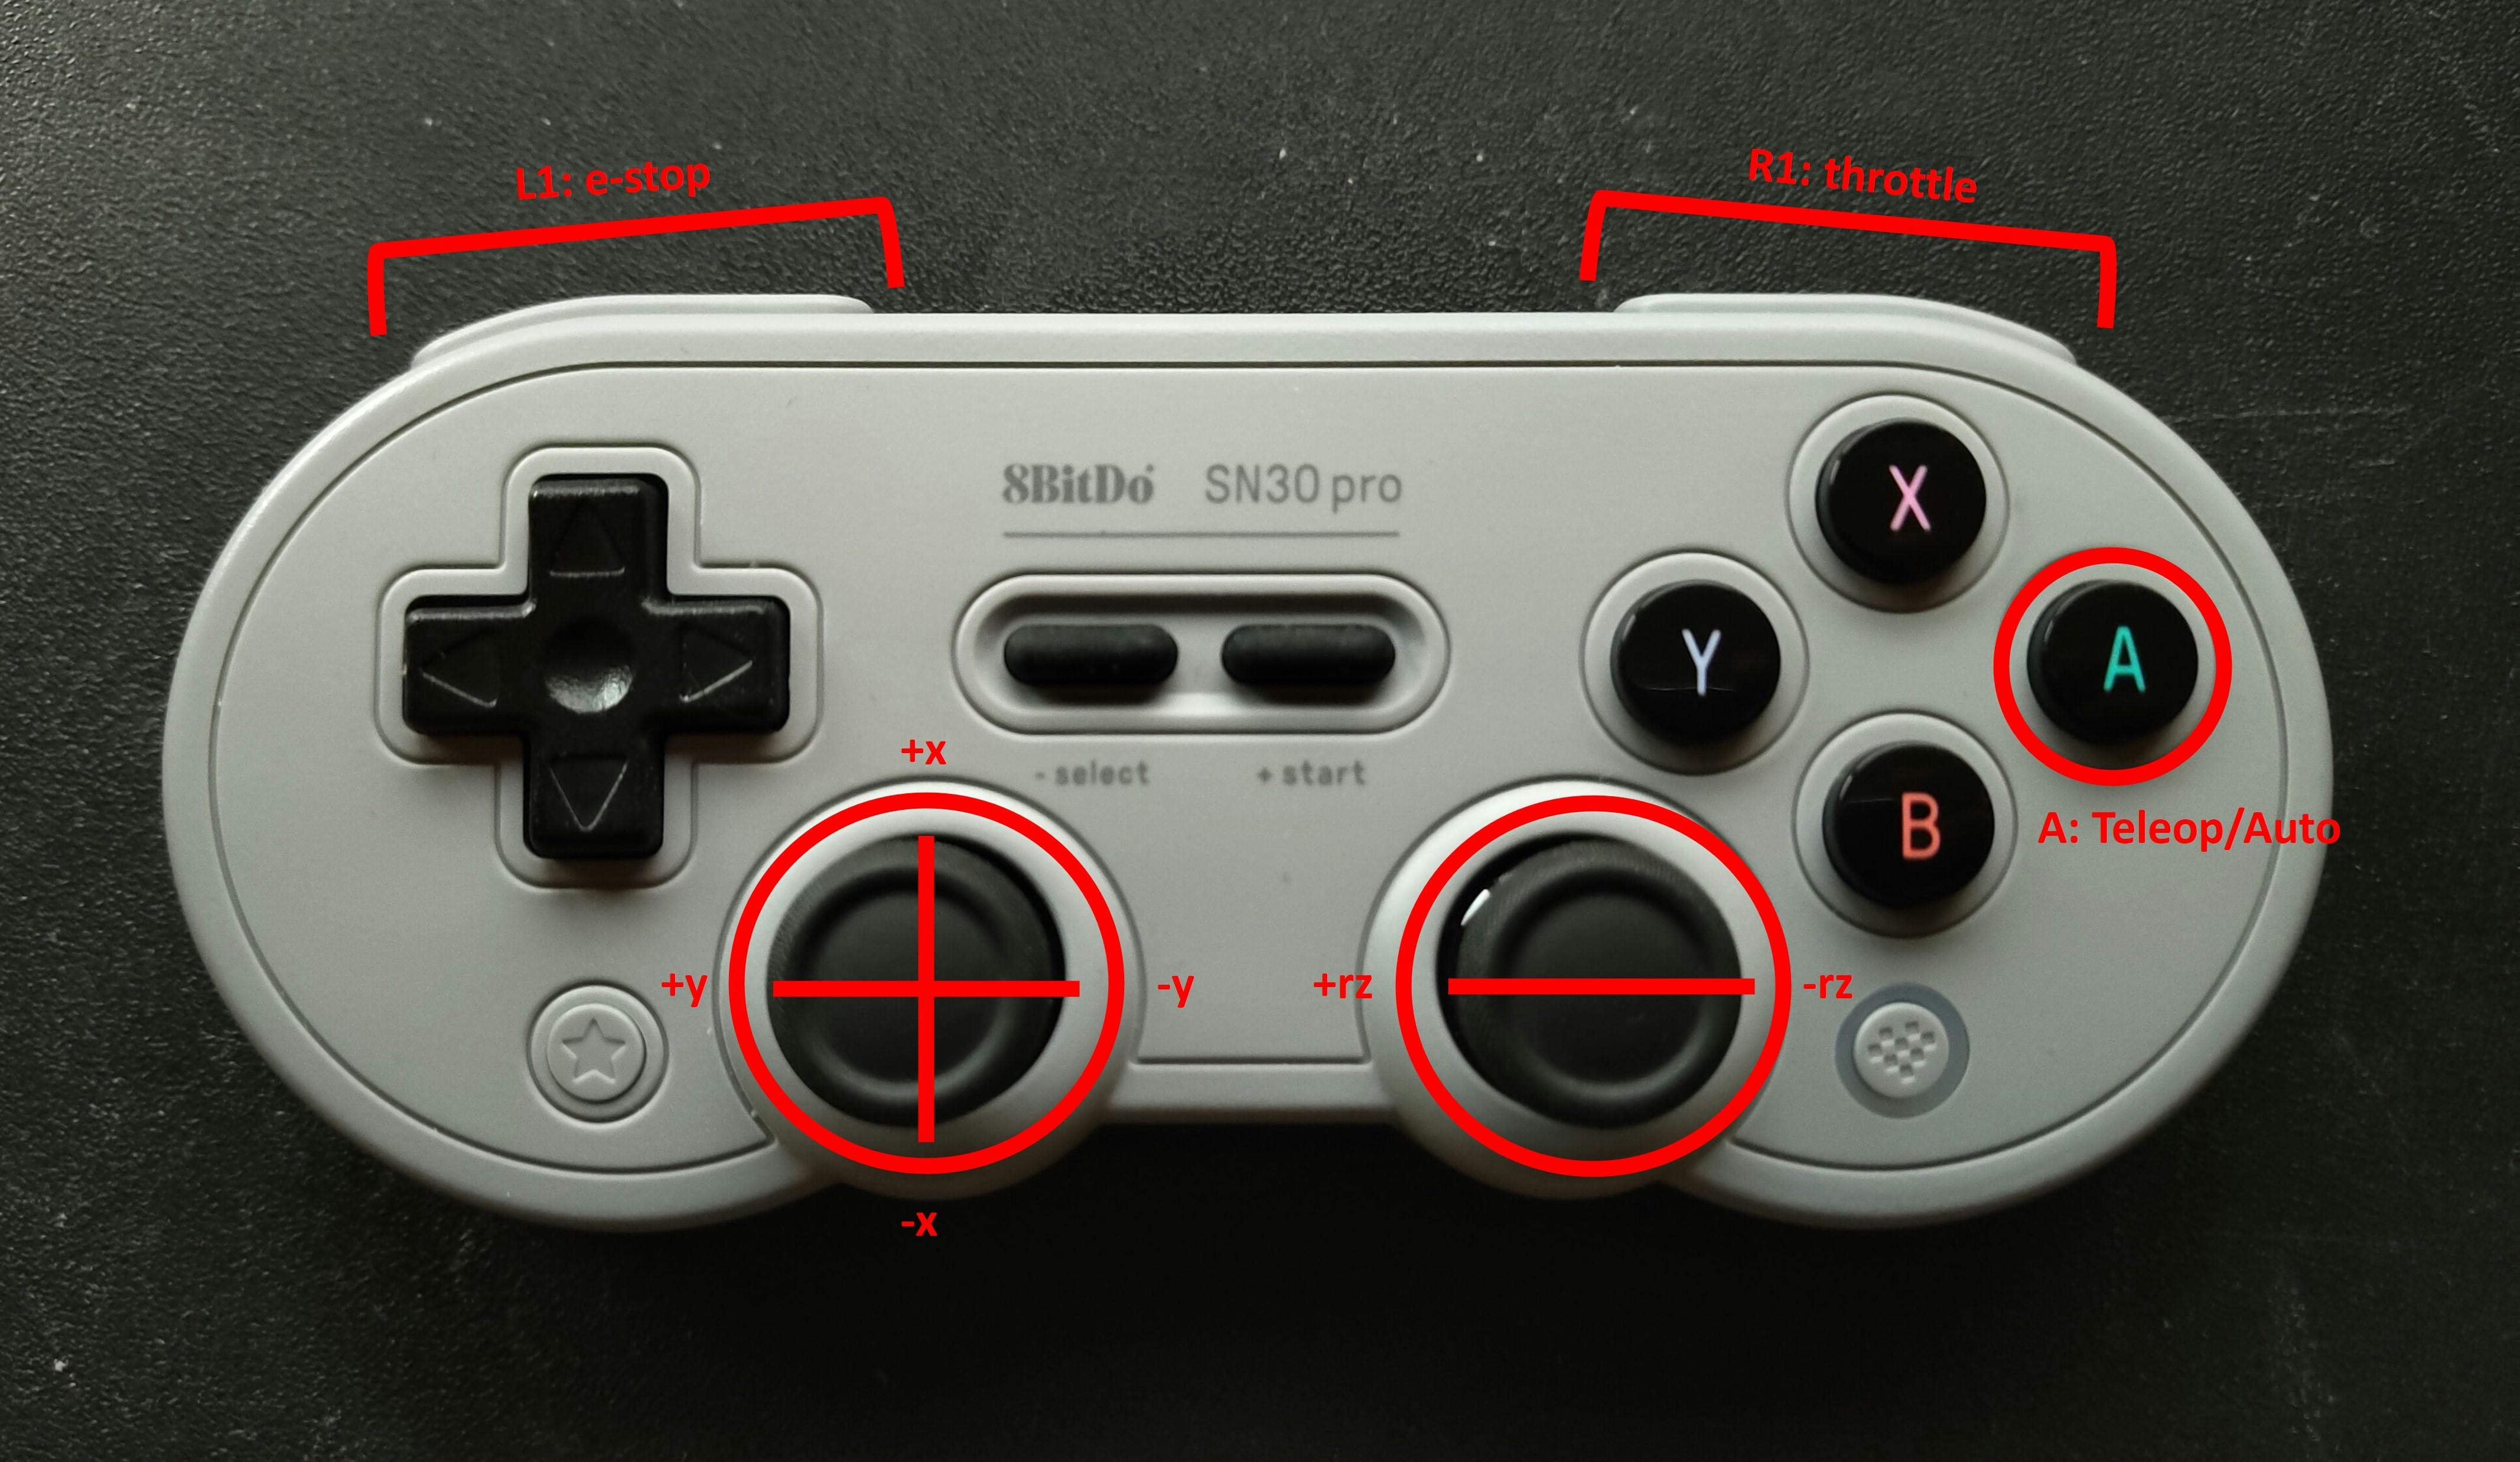
With the controller started in the Android mode (my preferred option for the RPi), I then connected it to the RPi in the same way as the PS4 or the Stadia controller and ran the same node to test the joystick output. Using this I verified the mapping and set the mode and twist configs. I also tried the X-input mode, which does not always work for some reason. I did not investigate further. This mode also has haptic feedback enabled, but I also need to find a way to control the rumble and the LEDs. For now, the Android mode does everything I need and is definitely a good start.
Updating AKROS2 Mecanum
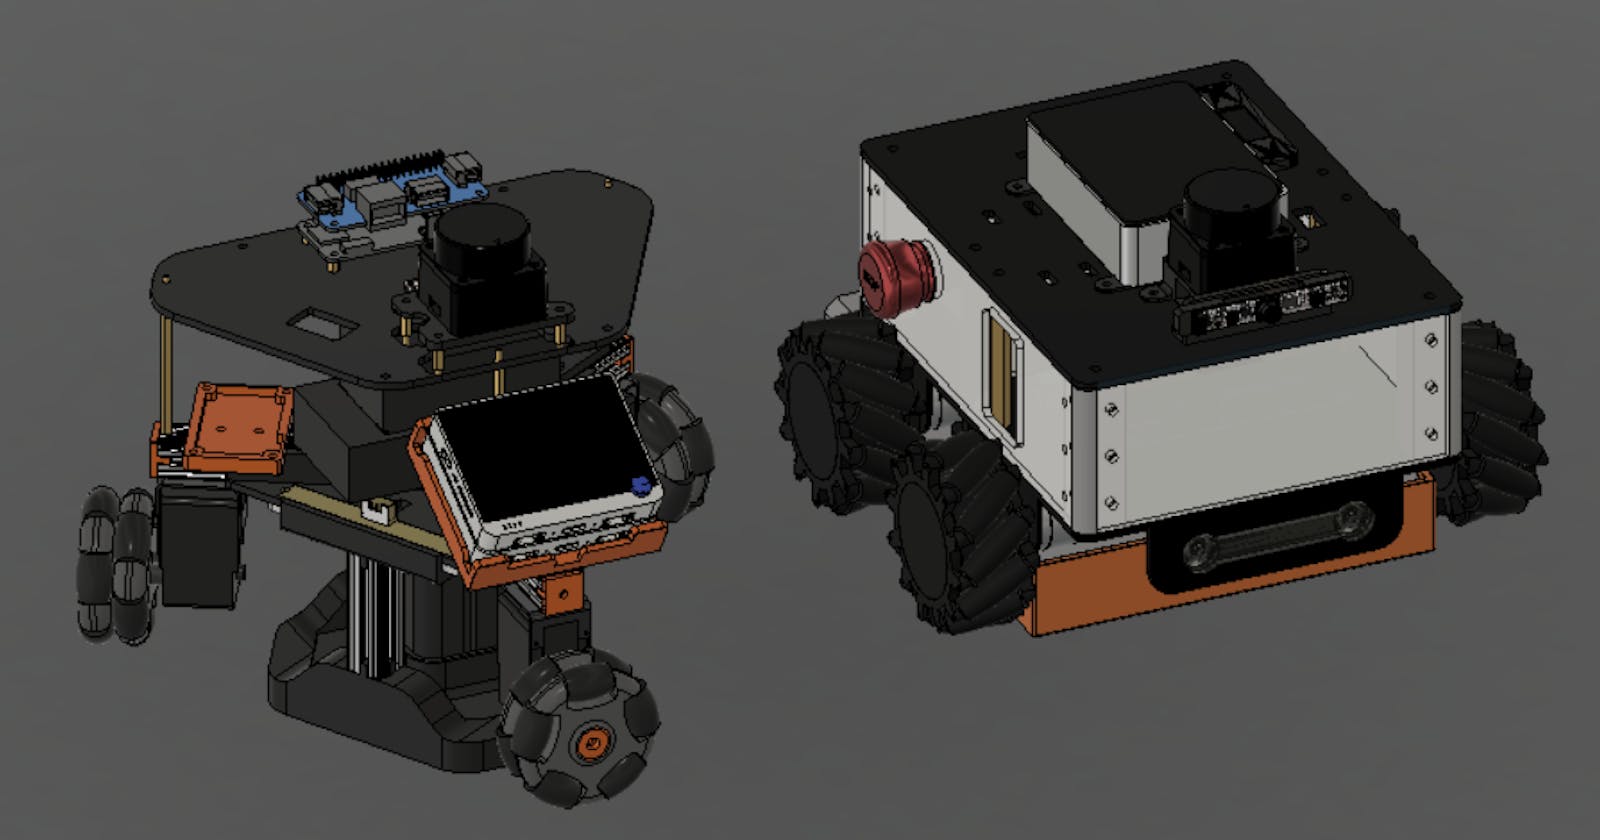
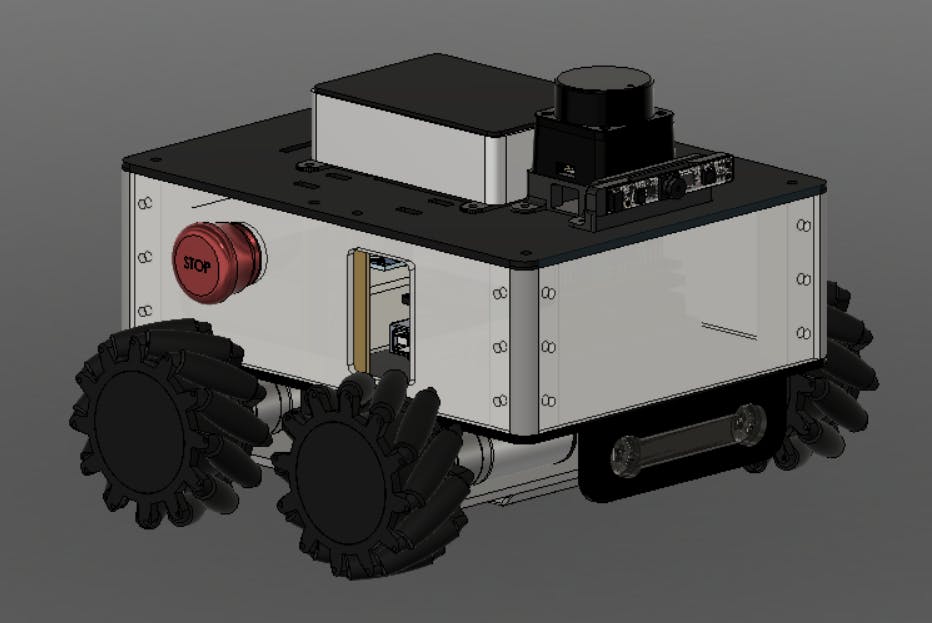
Other than playing around with controllers and sensors, I also made some upgrades to the AKROS2 Mecanum robot. I hadn't worked with this robot for quite some time, so I first started by updating the operating system and packages. Next, I tried to test everything by launching the drivers for the LD06 LIDAR, the T265 camera, the joystick controllers for teleoperation, and the micro-ROS Agent for the microcontroller client. There were some issues, which I then fixed, as I will explain in the following sections. After all the fixes and upgrades, this is what the AKROS2 Mecanum robot looks like:
Removing the T265 camera
During the bring-up, the RealSense ROS package just did not work with the T265. I realized that the latest update to the package had dropped support for the T265, so I then tried to revert to an older version. This did not work either. I went through the GitHub issues, and several different forums but did not find a solution. I even tried replacing the USB cable, but nothing worked. Eventually, I decided to retire the T265 and use it somewhere else (It still works on Windows).

It is a shame that Intel stopped supporting the T265. This should have been their flagship RealSense product, as there is no direct alternative for it on the market (As far as I know, this is the only Visual SLAM device out there). As for their other depth camera products, most roboticists are already moving on to other alternatives like Luxonis and StereoLabs products.

Updating the micro-ROS firmware
Next up, I took a look into the micro-ROS firmware to see what I could update. I started by removing the namespace from the firmware node, mainly because I realized that I couldn't remap micro-ROS topics from the micro-ROS Agent on the host side. Also, this makes things much cleaner.
I also realized that although my IMU was already providing measurements in the ENU (East-North-Up) convention (according to ROS REP-103), this might change if I used a different IMU. So, I added a transform from NED (North-East-Down) to ENU (swap x/y, negate z) if needed. This transform is only performed when a boolean parameter is set. I also added this parameter to the parameter server, which now has 5 parameters - the PID gains, the max RPM scale, and the NED to ENU boolean parameter.

Finally, I updated the micro-ROS libraries and tried to flash the updated firmware to my Teensy 4.1 breakout board. It did not work, the compilation failed with multiple errors. I first updated the Arduino IDE 2 and Teensy libraries to the latest version. I then deleted the micro_ros_arduino pre-built library, re-installed it, added the akros2_msgs message types, and tried to build the library again. This again failed with some errors. Eventually, after some digging, I realized that it worked in Linux so I tried building the library in WSL2 - and this worked as expected. I copied the newly built library to Windows 11 and was able to flash the firmware using the latest Arduino IDE 2. I hope this issue is fixed in the future, it was a bit annoying to switch between Windows and WSL2. For people who are using the Arduino IDE on Linux, this should not be an issue.
Once the firmware was flashed, I tried it out and it worked perfectly. I then had the idea of adding an integer parameter to change the brightness of the status LEDs. I was able to flash the firmware after adding this parameter, but when I tried to run it, the firmware failed to create the parameter server and entered the error loop (flashes the LED twice repeatedly). I tried changing different configuration options in the micro_ros_arduino library but it still did not work. I have a suspicion that the parameter server is limited to only 5 parameters somewhere in the micro_ros_arduino library, but I haven't found it yet. I've raised an issue on GitHub and hoping for a response soon (fingers crossed).
Fusing IMU and Odometry
Now that I had the micro-ROS node working, I wanted to improve the odometry estimate by fusing it with IMU measurements using an Extended Kalman Filter. Naturally, I decided to use the robot_localization package, which has been my go-to EKF/UKF implementation since ROS 1. Before I could do this, I wanted to improve my IMU measurements, so I put it through a Madgwick filter.
The IMU tools package that I used also provides an implementation of the Complementary Filter. They are both commonly used implementations to compute the orientation using angular velocities, accelerations, and optionally magnetometer readings (my MPU9250 does not have a working magnetometer) from an IMU. While I chose the Madgwick filter, I haven't gone through the difference in performance between the two filters, so I do not have an answer to which one is better.
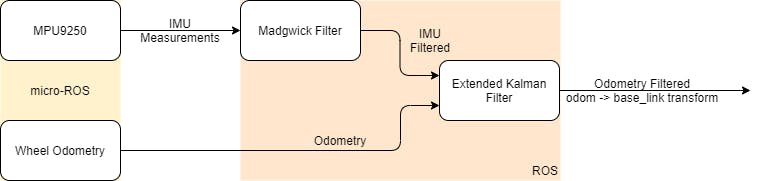
I then created the config file for robot_localization using Automatic Addison's incredible blog as a reference and used the default covariance values for fusing the odometry and IMU measurements. I still need to find some time and tune the covariances and the different options that robot_localization provides. For now, the generated filtered odometry values and the odom->base_link transform are sufficient. I did notice something though, turns out the robot_localization package does not work if the odometry frame is called anything other than odom. This is a bit strange since in ROS 1 I have been able to rename the odometry frame. If anyone knows why this is happening in ROS 2, please help me out by answering my Robotics Stack Exchange question here.
If you want to know more about Kalman Filters, here's one of my favorite resources on the topic: How a Kalman Filter works, in pictures. However, this does not cover the Extended Kalman Filter. For a more detailed understanding, here's an amazing video + blog series by Sharad Maheshwari and Mathias Mantelli:
Adding a Camera
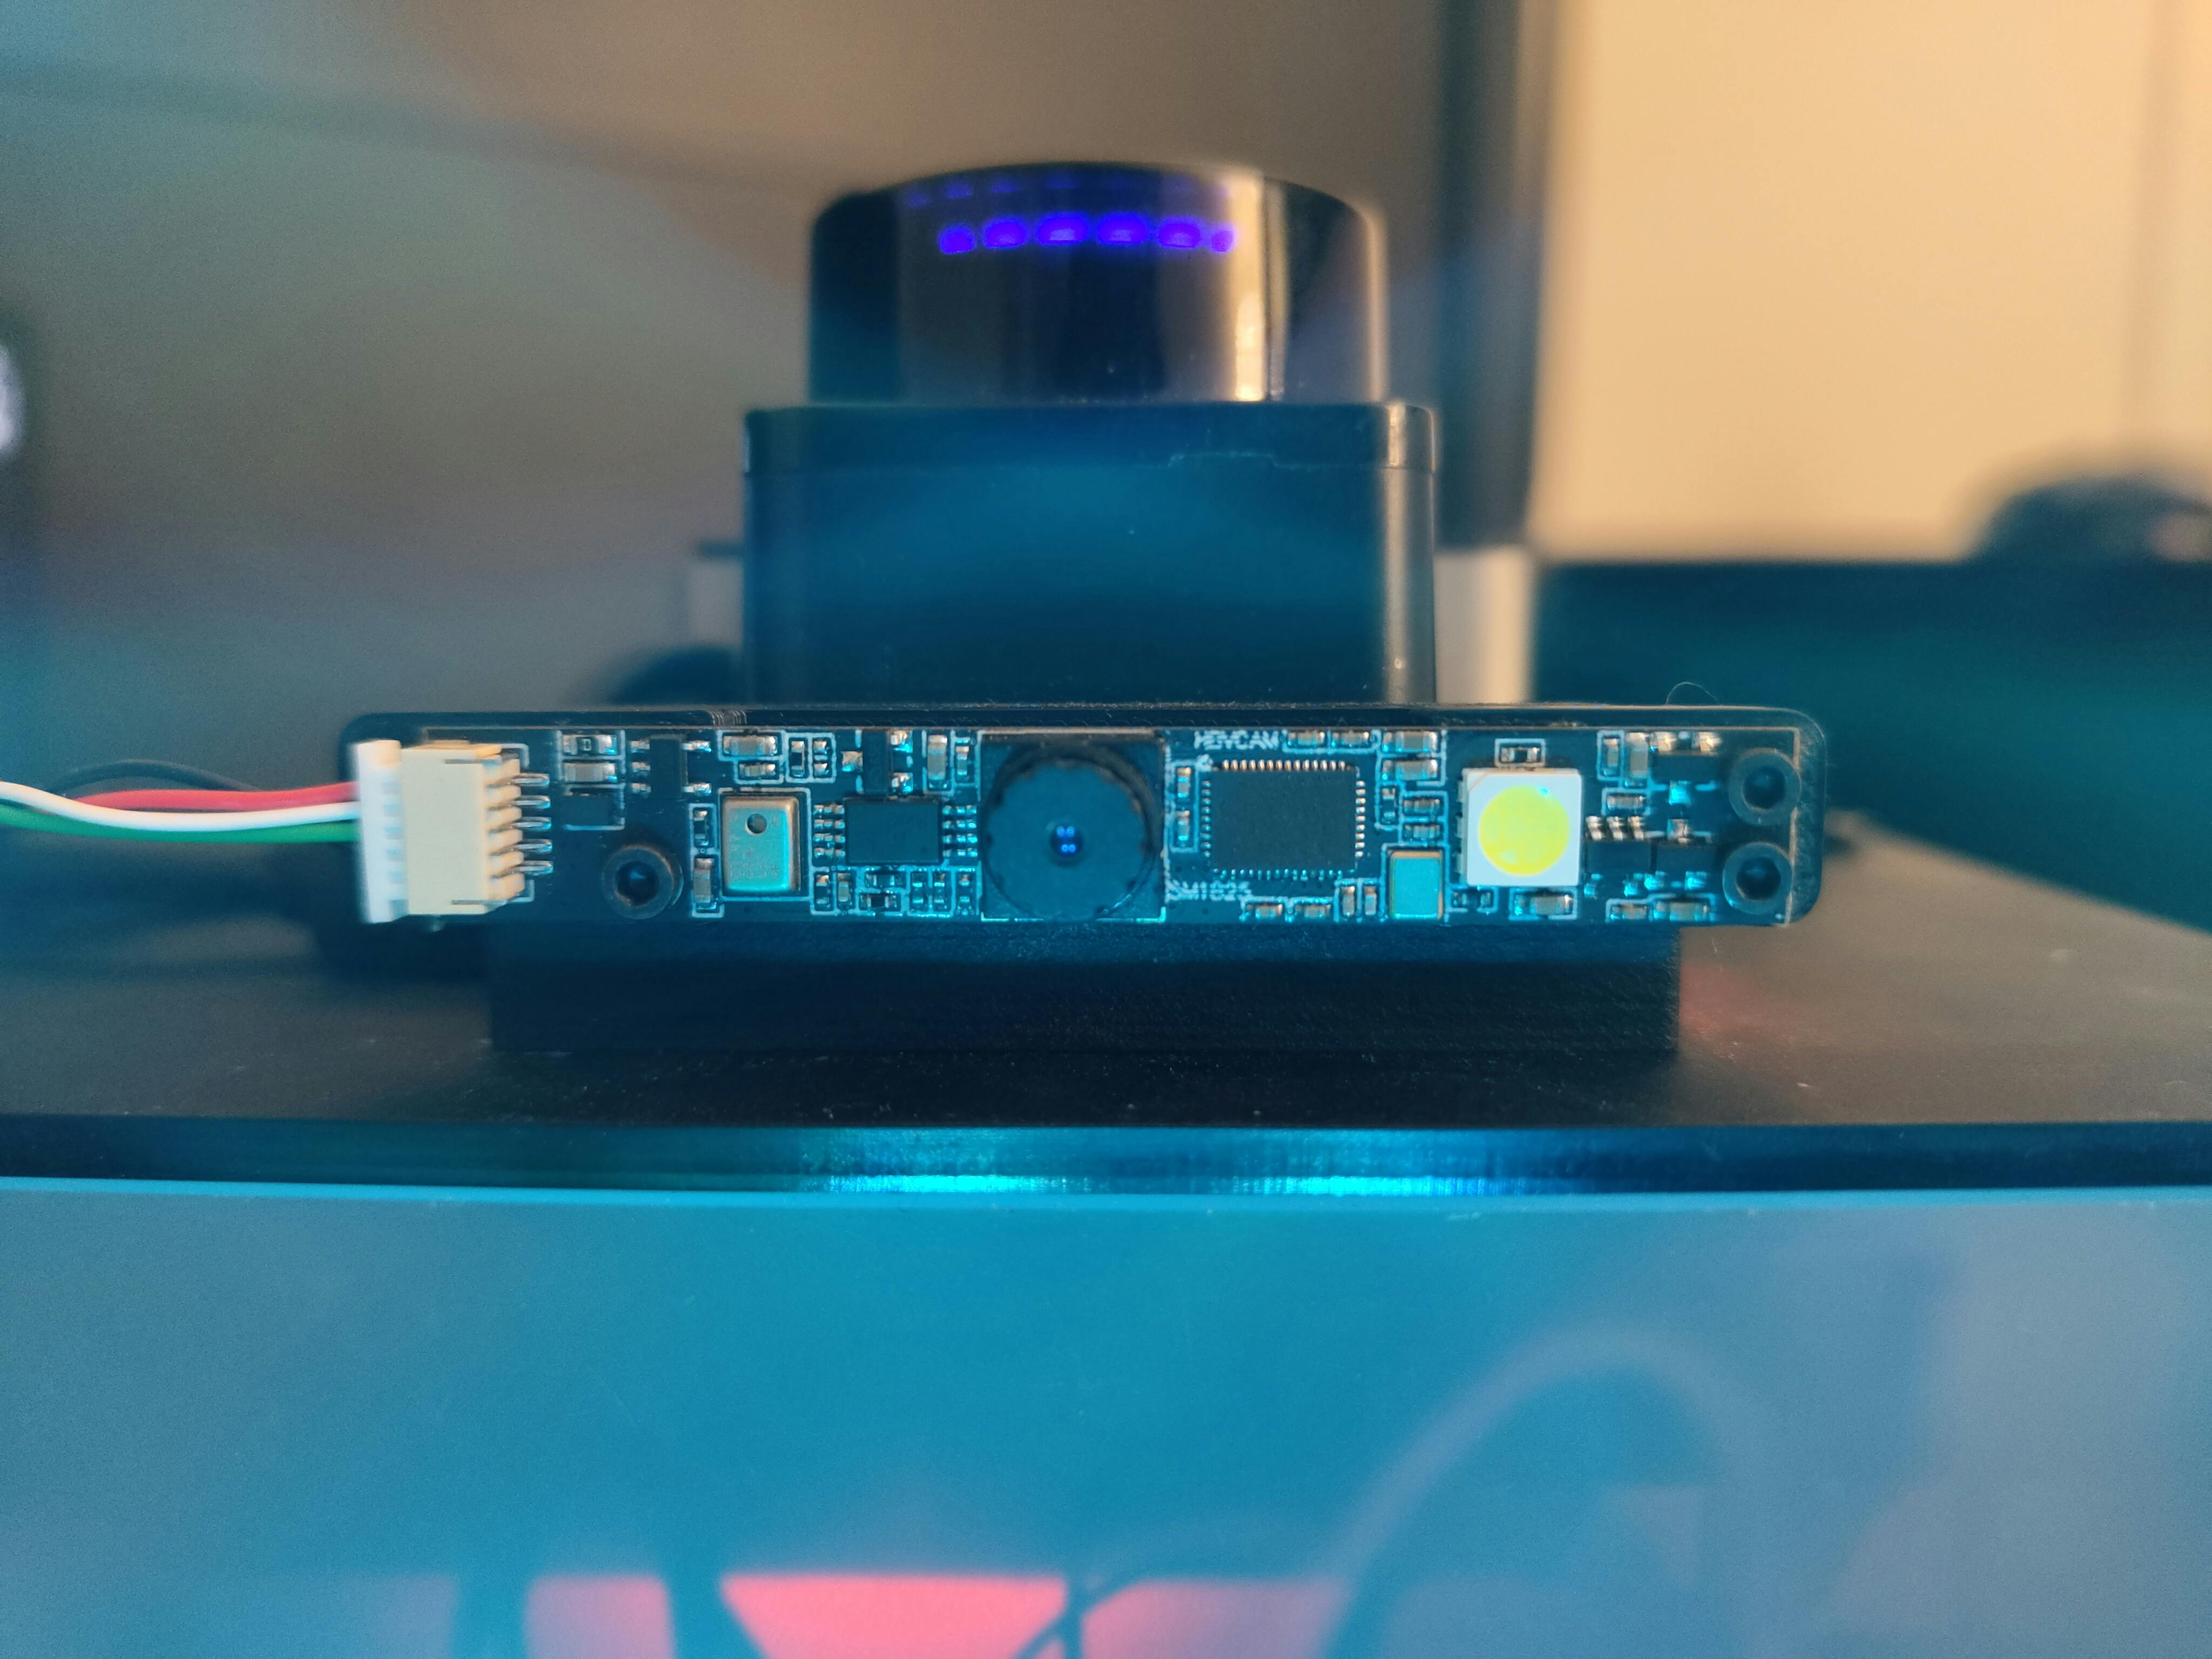
In the past, I used the T265 camera for two reasons - to provide odometry and IMU information and to stream video streams when needed. I'm now using a different IMU and fusing it with the wheel odometry has worked fine so far. But since removing the T265, I cannot stream video anymore. So, I bought this tiny USB web camera from Amazon, that has a 5MP image sensor (with a 60-degree FOV), a microphone, and an LED for low-light conditions.

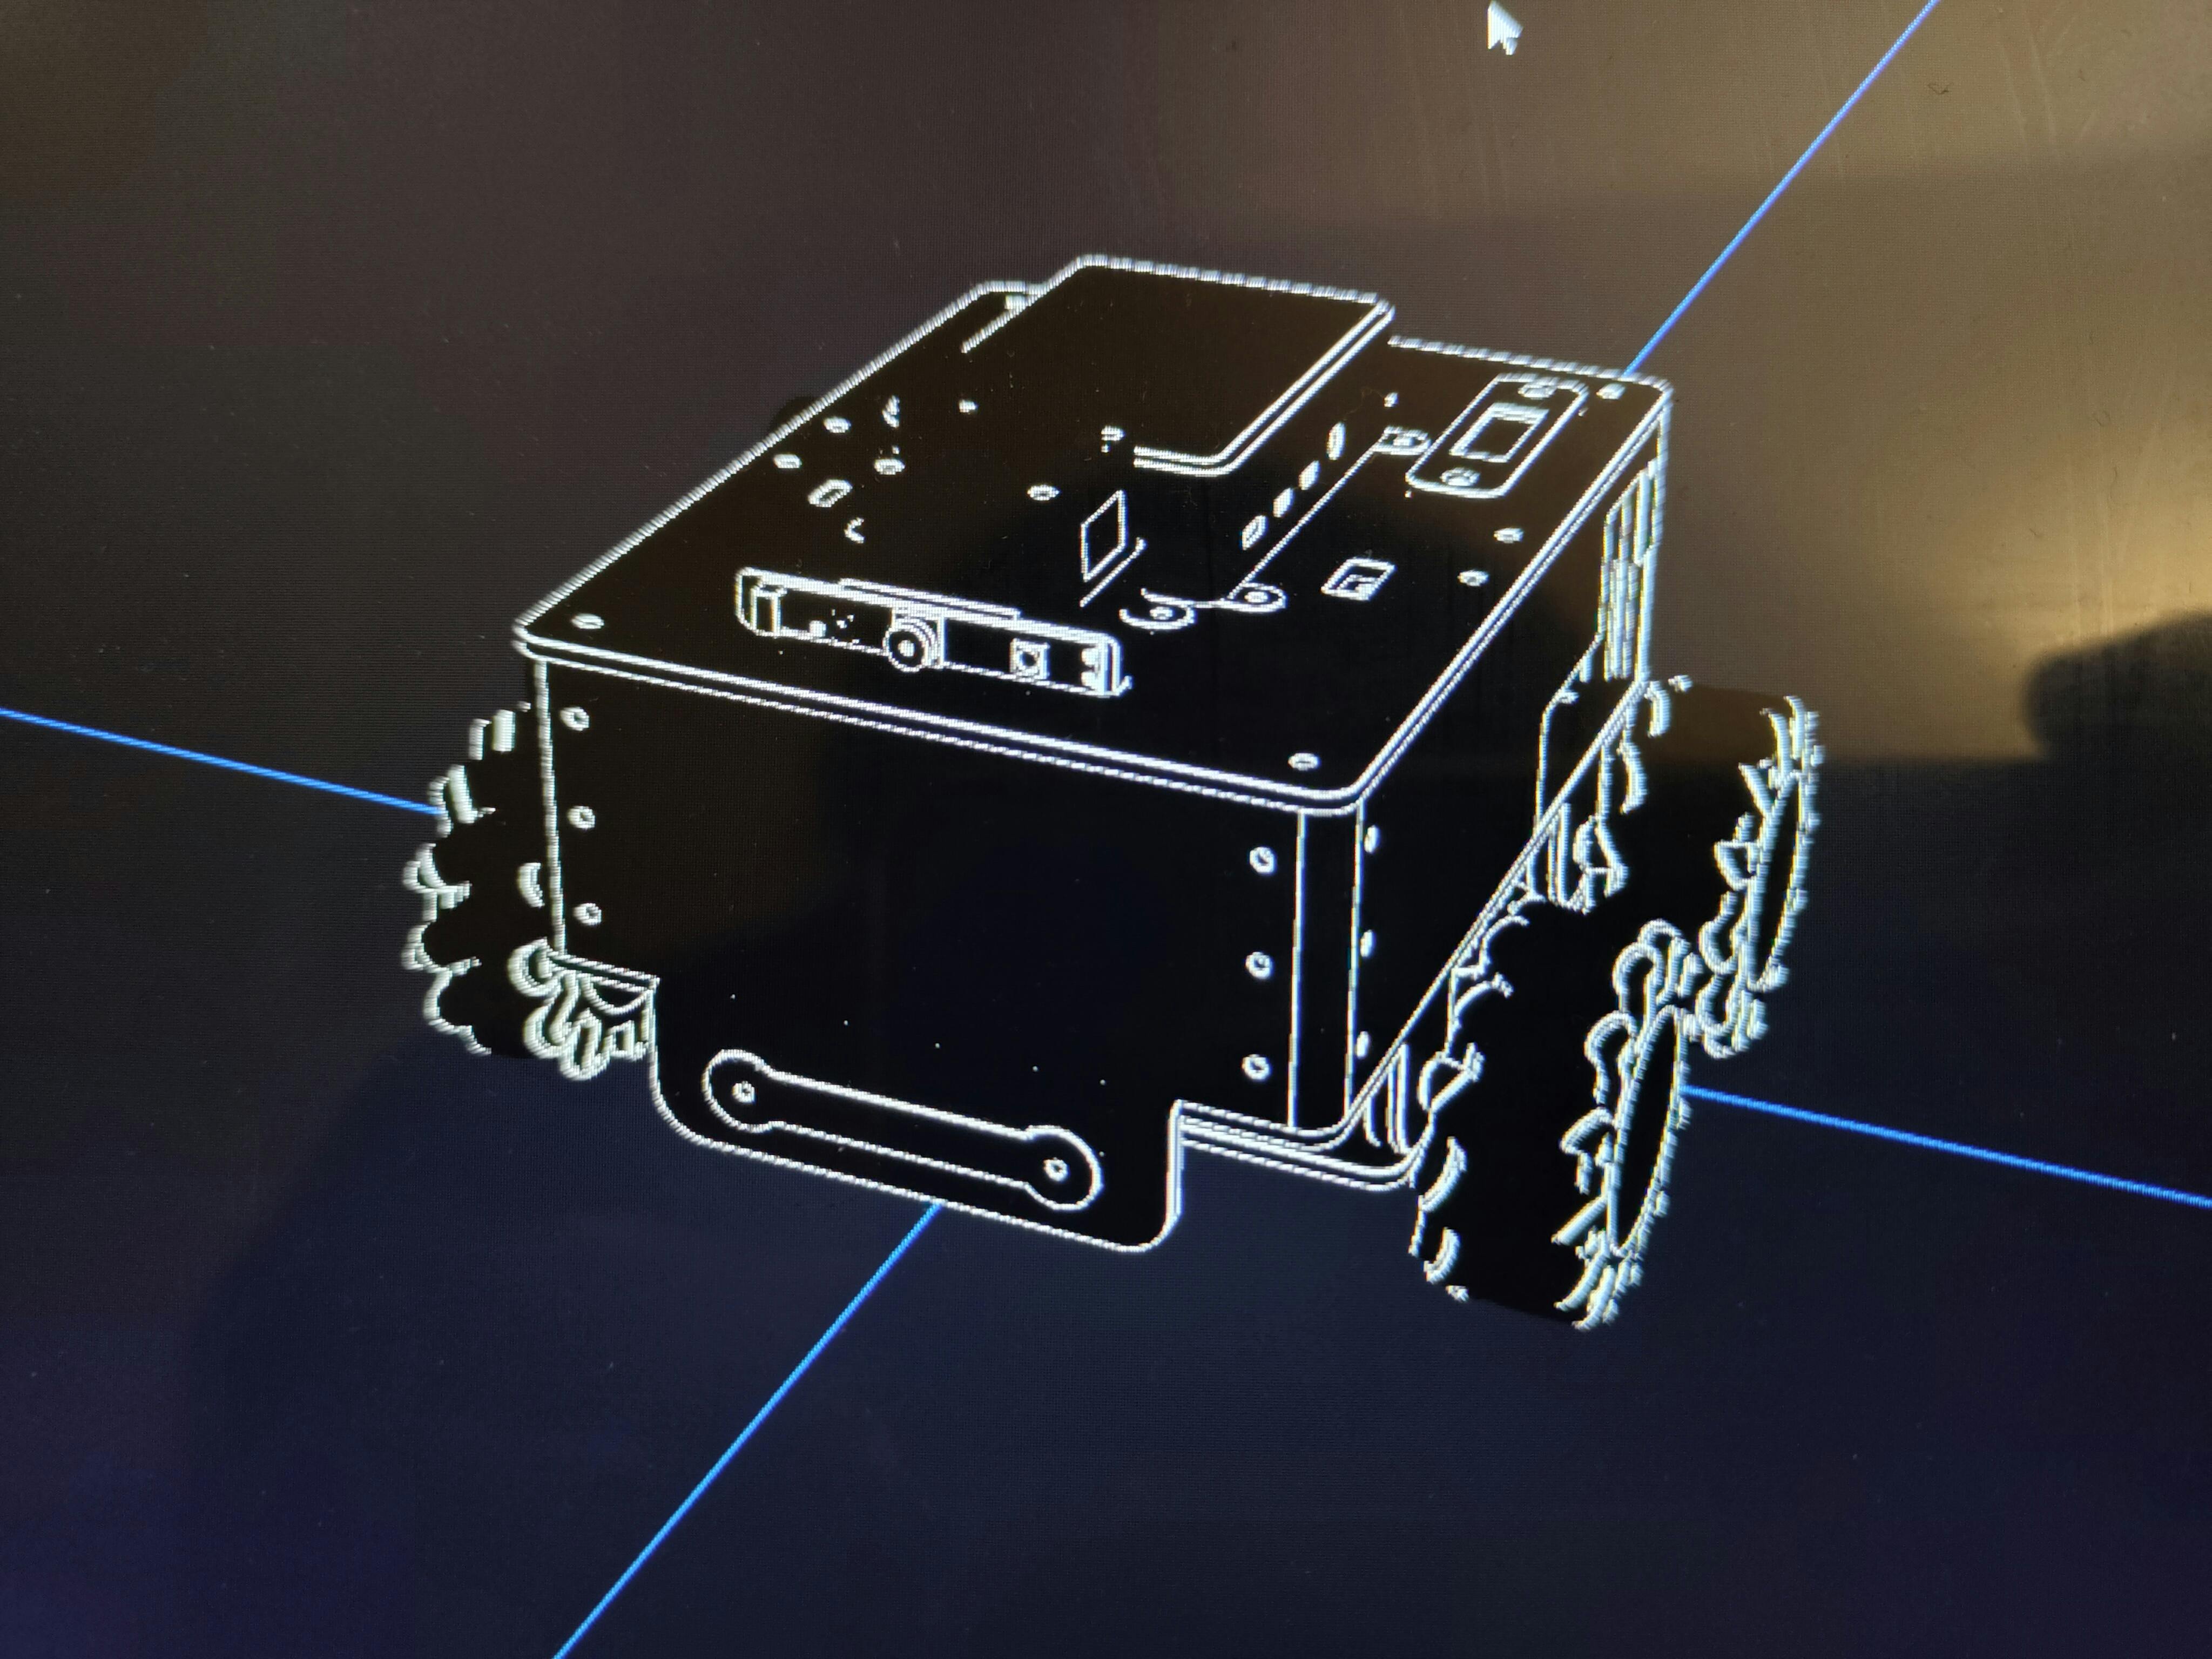
I then made a small mount for the camera, so that the assembly could fit onto the same mounting point as the T265. This can be seen in the CAD model below:

Finally, I updated the URDF, which can be seen in the Foxglove Studio visualization here:
Next, I managed to use v4l2_camera node to publish the camera output as ROS 2 Image messages. Additionally, I also used the image_transport_plugins to automatically republish the Image messages as compressed images. I did have an issue when launching the v4l2_camera node as a composable node, where the compressed image transport plugin did not automatically publish a compressed image stream. I even asked for a solution on the Robotics Stack Exchange, but no luck so far. For now, I am launching v4l2_camera as a normal node, which works as expected.
There are currently a few issues that I still need to address: firstly, the addition of the camera meta-data which will be published as a CameraInfo message. Next, I want to be able to stream audio from the camera's on-board microphone. Finally, I want to control the LED using a ROS 2 service. This is still a work in progress and will carry forward to 2024.
For now, I can visualize the images remotely from Foxglove Studio. However, it only works without any lag when both my Foxglove Studio device and the robot are on the same access point. When connected to different access points (while still connected to the same Tailscale network), there is some visible latency in the camera stream, even when displaying the compressed image stream. From some research, it seems Cyclone DDS should improve things significantly (I am currently using Fast DDS). Even with Cyclone DDS, some latency can still be expected. Another improvement to this will be using WebRTC instead.
The above video from Polyhobbyist gives a brief introduction to RobotWebTools and the webrtc_ros package. I first tried cloning and building the original webrtc_ros from RobotWebTools, but this did not work - I ended up with some build issues. I did not investigate this - but maybe this was an issue with ROS 2 Humble. Next, I cloned Polyhobbyist's fork of webrtc_ros and tried building it. It took a while (about 1.5 hours), but this managed to build successfully. I had to leave on holiday and did not get a chance to try it out, but I will be working on it at the beginning of 2024. From what I've read, this alongside Cyclone DDS should solve any latency issues I have with video streaming.
Remote Teleoperation
Next, I also implemented remote teleoperation over the Tailscale VPN. I wanted to publish joystick commands over the internet, rather than having the joystick controller connected to the robot over Bluetooth. The main reason behind this was that the Bluetooth driver stopped working on the AKROS2 mecanum robot's RPi. I still don't know what the reason behind this is, but for now, I dare not try to reinstall the OS. One of my goals for 2024 is to be proficient with Docker, so maybe I'll try again once I reach this goal.

Meanwhile, for remote teleoperation, my system is as follows: I have the joystick connected to a spare RPi which is also on the same Tailscale VPN as the robot. I could have connected it to WSL2 on my laptop, but even after attaching the USB ports to WSL2, it does not show up as /dev/tty* devices, which is needed for the joystick ROS nodes. On the spare RPi, I run the joystick_drivers and the akros2_teleop packages, which publish the joystick status as Joy messages, and use the Joy messages to publish Twist and Mode messages. Since all devices are connected to the Tailscale VPN as Discovery Server super-clients, all these published topics are visible on the robot computer. The latency is minimal, almost negligible.

I have two goals for this feature - firstly, I want to upgrade to a Steam Deck device, where I can run ROS 2, the remote teleoperation nodes, and the visualization nodes on the same device. So, the Steam Deck will replace the RPi, the Joystick, and my laptop which I normally use for visualization. Secondly, I want to move to using Cyclone DDS as I mentioned earlier. From what I've read, Cyclone DDS should help in improving latency in the video streams. However, for teleoperation, I doubt there will be a significant improvement as the latency is already minimal.

Updating AKROS2 Omni
Next, I moved on to the AKROS2 Omni-wheeled robot. In my last update, I had finished the base assembly with the 3 Feetech STS3215 (or the Waveshare ST3215) motors, the motor controller, battery, LED strips, and a Wio Terminal. I had also experimented with driving the motors using a Raspberry Pi and tried running Micro-ROS on the Wio Terminal. Now, I decided to make some more updates to the robot.
First, I added a USB/Ethernet HAT to the RPi0. This lets me connect an LD06 LIDAR, the FE-URT-1 motor controller as well as the Wio Terminal using USB (I couldn't get micro-ROS working with UDP over WiFi, but Serial works perfectly). It also leaves the Ethernet port free for any future use.
Next, I added the LD06 LIDAR and a BNO085 IMU from Adafruit and designed a plate to hold them. I left some holes so that I can add spacers and another layer on top, for any additional payload and an I2C display to show the RPi0's IP address and other diagnostic information. But this is for the next update, for now, here's the 3D model of the robot, with the RPi0 (+ the USB/Ethernet HAT), the LD06, the IMU (which is between the RPi0 and the LD06) and the base plate.
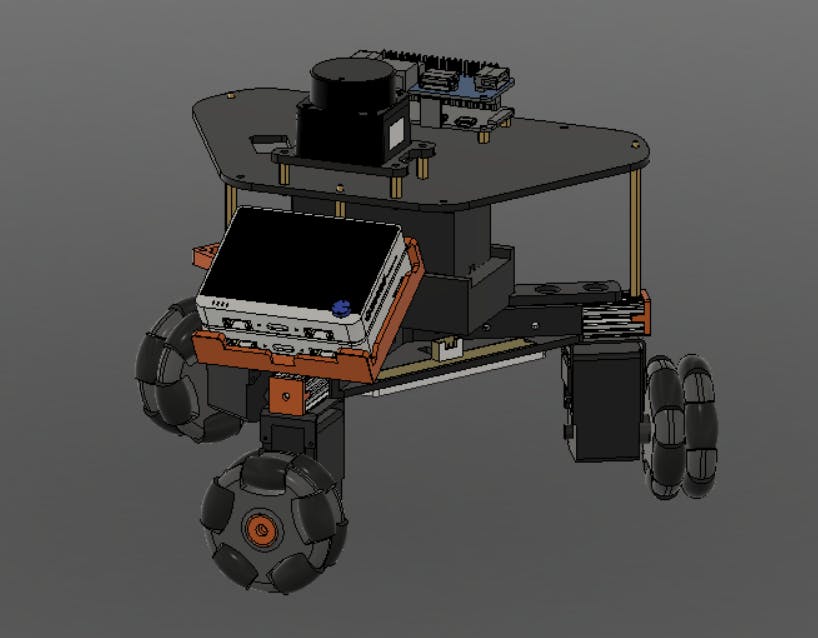
I am currently waiting for the laser-cut base plate and the IMU to arrive in the first week of January, so the final assembly will be slightly delayed.
Plans for 2024
As the year comes to an end, there are a few things that I want to work on in 2024. I already wanted to spend some time with ros2_control and Docker this year but did not get much time due to other commitments, so they are at the top of my list. Next, I want to finish the AKROS2 Omni robot assembly, and then the software using my new ros2_control skills, especially using the new hardware interface for the serial bus servo motors (WIP). For practicing ros2_control, I also plan on building a small differential drive robot, just to test out the existing differential drive controller. Once this is done, I will then work on my own three omni-wheeled controller for the AKROS2 Omni robot.
Another thing that will carry forward to 2024 is the webrtc_ros implementation. As I explained earlier, I now have a new camera on board the AKROS2 Mecanum robot, and I need webrtc_ros for streaming the images from it. Additionally, I also want to move from Fast DDS to Cyclone DDS as it seems to reduce latency over distributed systems, especially for camera images.
Besides ros2_control, Docker, webrtc_ros and Cyclone DDS, I also plan to work with (or at least explore) the following things:
Micro-ROS: I've mostly worked with micro_ros_arduino and the Arduino IDE 2, now I want to develop using the ESP32 family of microcontrollers, especially the new ESP32-S3. I've also purchased a couple of XIAO ESP32-S3 boards, which I want to try. I also want to play around with the Raspberry Pi Pico and the RP2040 microcontroller.
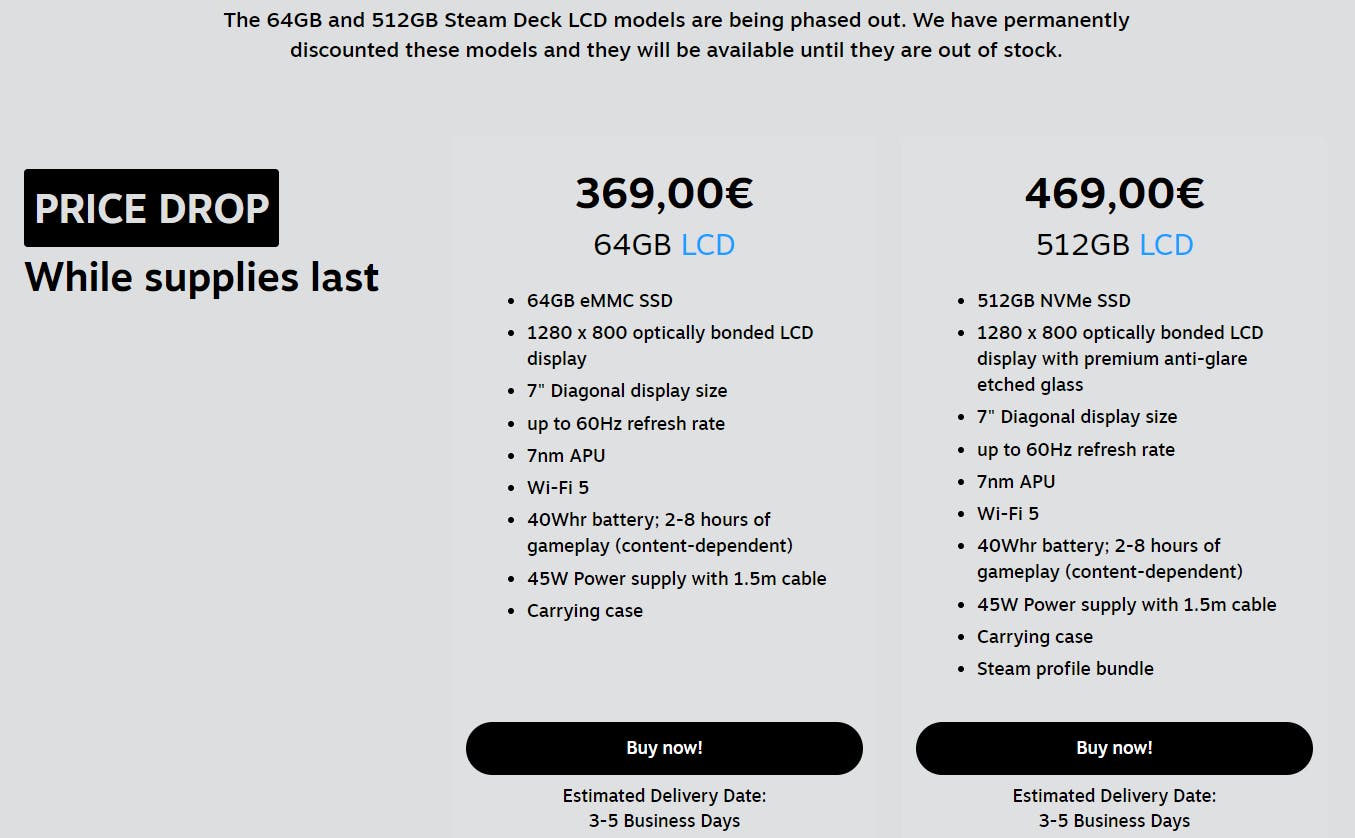
Teleop with Steam Deck: As a holiday present for myself, I ordered a Steam Deck 64GB a few days ago. I've seen it running ROS and controlling robots on multiple occasions and want to give it a try. As a bonus, I can also play games with it. PS: Since the launch of the new Steam Deck OLED, the price for the non-OLED variants have dropped significantly, especially the 64GB version that does not have an NVMe SSD. So, it is a perfect time to get one!
Gazebo: Time to finally get started with Gazebo. The last time I used it was for my master thesis between 2016 and 2017 and I haven't touched it since. I want to implement Gazebo simulations for both the AKROS2 Mecanum and Omni robots.
Nav2: Same thing goes for Nav2. Once the control and simulation packages are done, time to implement the navigation stack for both Mecanum and Omni robots.
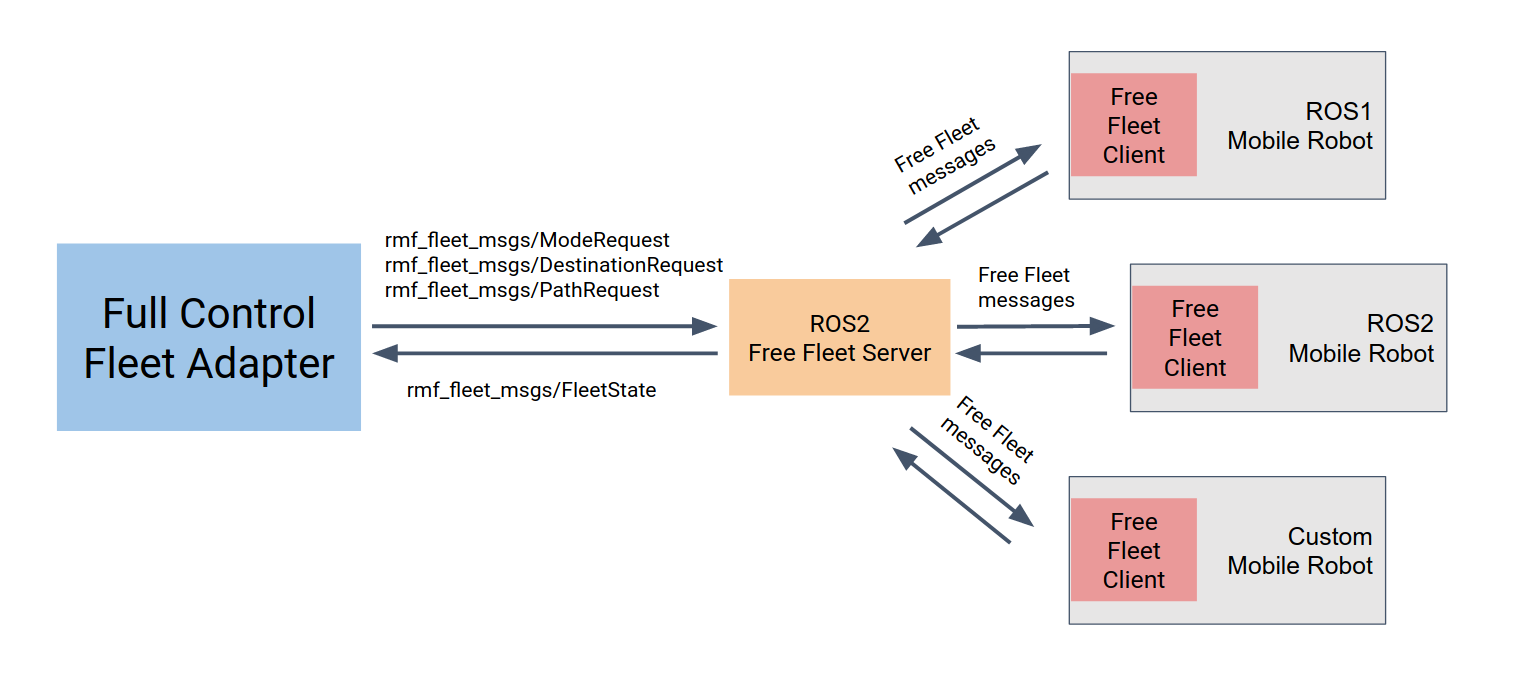
Fleet Management: Once I have both robots navigating autonomously, I want to control them together. For fleet management, I want to explore existing solutions like Open-RMF but I would also like to take a shot at designing a solution myself. I think I'll eventually end up building on top of an existing open-source solution. I've already started reading this multi-robot notebook by OSRF for this...
Zenoh: Zenoh was chosen earlier this year as an alternate RMW alongside other DDS RMWs for future releases of ROS 2. This should solve quite a lot of the issues users face while working with DDS. For now, Zenoh can be tried out with ROS 2 Humble by using the Zenoh-DDS bridge, which relies on Cyclone DDS. Since I'm already moving to Cyclone DDS, seems like a perfect opportunity to try Zenoh out as well.
ROSCon: Finally, ROSCon 2024 which will be held in Odense, Denmark. Perfect location for me, since it is about 3 hours away from Eindhoven (flight + train), and no need for any visa as well! I will definitely be attending. I also want to try to attend other local ROSCons in Europe, as long as they are in English. I hope they have a ROSCon India next year as well, which I also want to attend (I had to cancel my plans last minute this year).

That said, thanks for reading so far. I hope you have a fun time during the holidays, and wishing you all an excellent 2024!